Hướng dẫn tích hợp SumSub (KYC & KYB) vào ứng dụng Node.js Express
1. Chuẩn bị
Trước khi bắt đầu, hãy đảm bảo bạn đã cài đặt các thư viện cần thiết:
npm install express axios dotenv crypto
2. Cấu hình Môi trường
Tạo file .env để lưu trữ các thông tin cấu hình từ SumSub. Lưu ý rằng SumSub có thể sử dụng các App Token khác nhau cho flow KYC và KYB tùy thuộc vào cách bạn setup trên dashboard.
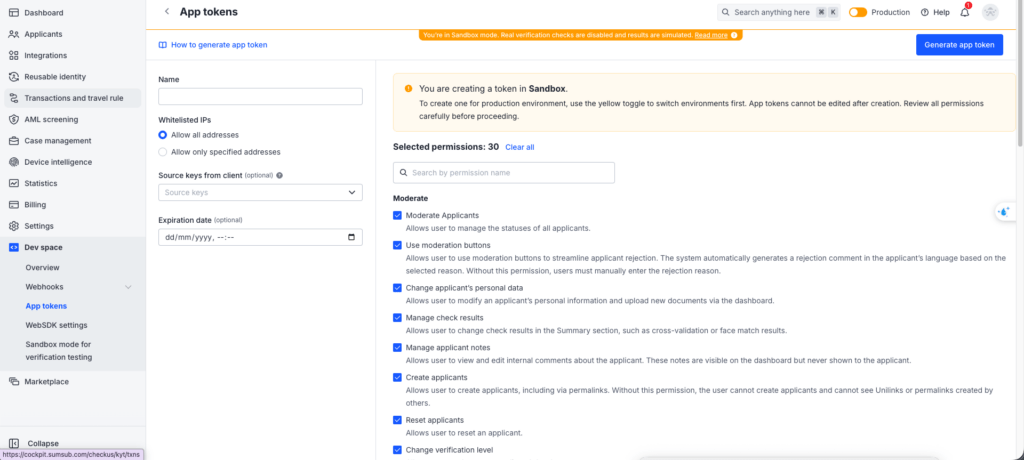
Để lấy token Truy cập vào dashboard và tạo theo ảnh:
SUMSUB_BASE_URL=https://api.sumsub.com
SUMSUB_TOKEN=t_kyc_...
SUMSUB_SECRET_KEY=s_kyc_...
3. Code mẫu (ExpressJS)
Dưới đây là ví dụ triển khai đầy đủ bao gồm việc tạo chữ ký bảo mật (HMAC SHA256) và các API endpoint cơ bản. Theo hướng dẫn từ SumSub
Tạo một file service để xử lý logic gọi API đến SumSub.
const axios = require('axios');
const crypto = require('crypto');
require('dotenv').config();

const SUMSUB_BASE_URL = process.env.SUMSUB_BASE_URL

// Hàm lấy cấu hình
const getConfig = () => {
  return {
    token: process.env.SUMSUB_TOKEN,
    secretKey: process.env.SUMSUB_SECRET_KEY,
  };
};

// Hàm tạo chữ ký bảo mật (Signature)
const generateSignature = (method, url, ts, secretKey, body) => {
  const bodyString = body ? JSON.stringify(body) : '';
  const dataToSign = ts + method + url + bodyString;
  return crypto
    .createHmac('sha256', secretKey)
    .update(dataToSign)
    .digest('hex');
};

// Hàm gửi request đến SumSub
const sendRequest = async (method, url, body = null) => {
  const { token, secretKey } = getConfig(isKyb);
  const timestamp = Math.floor(Date.now() / 1000);
  const fullUrl = `${SUMSUB_BASE_URL}${url}`;

  const signature = generateSignature(method, url, timestamp, secretKey, body);

  const config = {
    method,
    url: fullUrl,
    headers: {
      'X-App-Token': token,
      'X-App-Access-Sig': signature,
      'X-App-Access-Ts': timestamp.toString(),
      'Content-Type': 'application/json',
    },
    data: body,
  };

  try {
    const response = await axios(config);
    return response.data;
  } catch (error) {
    console.error(
      `SumSub API Error [${method} ${url}]:`,
      error.response?.data || error.message,
    );
    throw error;
  }
};

const createApplicant = async (applicantData, levelName) => {
    const url = `/resources/applicants?levelName=${levelName}`;
    const body = { ...applicantData, type };

    return await sendRequest('POST', url, body);
  }

const  generateAccessToken = async (externalUserId, levelName) => {
    const url = '/resources/accessTokens/sdk';
    const body = {
      userId: externalUserId,
      levelName: levelName,
      ttlInSecs: 1800,
    };
    return await sendRequest('POST', url, body);
  }

const getApplicantStatus = async (applicantId) => {
    const url = `/resources/applicants/${applicantId}/one`;
    return await sendRequest('GET', url);
}
Một số endpoint cần thiết – Tạo một file app.js
const express = require('express');
const sumsubService = require('./sumsub.service');
const app = express();

app.use(express.json());

// Endpoint tạo Access Token cho SDK (Frontend dùng token này để init WebSDK)
app.post('/api/sumsub/access-token', async (req, res) => {
  try {
    const { userId, levelName } = req.body;

    const data = await sumsubService.generateAccessToken(
      userId,
      levelName,
    );
    res.json(data);
  } catch (error) {
    res.status(500).json({ error: 'Failed to generate access token' });
  }
});

// Endpoint tạo Applicant (Optional - thường SDK sẽ tự tạo, nhưng backend có thể tạo trước)
app.post('/api/sumsub/applicants', async (req, res) => {
  try {
    const { externalUserId, levelName, info } = req.body;

    const applicantData = {
      externalUserId,
      info, // Thông tin user (firstName, lastName, ...)
    };

    const data = await sumsubService.createApplicant(
      applicantData,
      levelName,
    );
    res.json(data);
  } catch (error) {
    res.status(500).json({ error: 'Failed to create applicant' });
  }
});

// Endpoint nhận Webhook từ SumSub (Cần verify signature - chưa bao gồm trong ví dụ đơn giản này)
app.post('/api/sumsub/webhook', (req, res) => {
  console.log('Webhook received:', req.body);
  // Xử lý logic khi user hoàn thành KYC/KYB
  // ...
  res.sendStatus(200);
});

const PORT = process.env.PORT || 3000;
app.listen(PORT, () => {
  console.log(`Server is running on port ${PORT}`);
});
Để test webhook local, chúng ta có thể dùng dịch vụ bên thứ ba
https://webhook.site/#!/view/ba7c5e1c-af07-4907-9840-7dfda57578b1
Sau khi nhận được webhook có thể dùng Postman để test local
4. Lưu ý quan trọng
Với KYC Flow tại môi trường sandbox kết quả luôn trả về true
Đối với KYB tại môi trường Sandbox kết quả sẽ luôn hiển thị Pending
Để test data với webhook thực tế đối với KYB. Sumsub cung cấp cho chúng ta API để simulate kết quả
https://docs.sumsub.com/reference/simulate-review-response-in-sandbox
Bổ sung thêm vào sumsub service
async function simulateReviewResponse(
    applicantId: string,
    reviewData: SimulateReviewResponseDto,
  ) {
    try {
      logger.debug(
        `Simulating review response for applicant ${applicantId}: ${JSON.stringify(reviewData)}`,
      );

      const response = await this.sendRequest(
        'POST',
        `/resources/applicants/${applicantId}/status/testCompleted`,
        reviewData,
      );

      logger.debug(
        `Successfully simulated review response for applicant ${applicantId}`,
      );

      return { data: response.data, status: response.status };
    } catch (error) {
      logger.error(
        `Failed to simulate review response for applicant ${applicantId}: ${error.message}`,
      );
      if (error.response) {
        throw new HttpException(
          `SumSub API error: ${error.response.data?.description || error.message}`,
          error.response.status,
        );
      }
      throw error;
    }
  }
Với SimulateReviewResponseDto
enum ReviewRejectType {
  RETRY = 'RETRY',
  FINAL = 'FINAL',
}

export class SimulateReviewResponseDto {
  reviewAnswer: SumSubResult;
}
Hy vọng hướng dẫn và đoạn code mẫu trên sẽ giúp các bạn khởi tạo nhanh chóng và dễ dàng tích hợp SumSub vào dự án của mình, tiết kiệm thời gian nghiên cứu tài liệu ban đầu. Chúc các bạn thành công!